Introduction
When you visit a website, such as codeopolis.com your computer will contact your DNS provider and ask for the IP address of codeopolis.com so your computer can visit the site. The DNS provider will then log that request, creating a record of your visit. Can you trust that your DNS provider or Internet Service Provider (ISP) will not share or sell that information? I don’t.
This tutorial will help you set up your own Unbound DNS resolver as a Docker container so you don’t have to rely on your ISP or third-party DNS resolvers such as OpenDNS.
This tutorial assumes that you already have Docker installed on your system. If not, you can view the Quick and Easy Steps to Install Docker.
What is Unbound?
Unbound is a free and open-source (FOSS) DNS resolver that has the ability to contact DNS authority servers directly in order to validate and cache the queries on your network and serve them to you directly. It is a very lightweight application and has built-in support for DNS-over-TLS.
1. Prepare the Docker Container
Of course this application will be ran as a container on Docker due to it’s ease of use, increased security and amazing performance capabilities when compared to running the application on a virtual machine.
All we need to do is create volume and then run the container by copying and pasting a few simple commands into the terminal.
2. Create a Volume
A volume is required for this container in order to ensure that the configuration persists if the container is stopped or updated. To create volume, run the following command:
docker volume create unbound
This command will create an volume named unbound on your system. We will pair this volume with the /opt/unbound/etc/unbound/directory within the container.
After the volume is created, it is time to run the container. The below command will name the container unbound. It will also expose port 53 (Note: Ubuntu users may need to disable DNS on the docker server prior to running this container, see https://askubuntu.com/questions/907246/how-to-disable-systemd-resolved-in-ubuntu). It is set to restart itself unless it is manually stopped. It will also run in detached mode.
3. Docker Run Command
The container itself, mvance/unbound:latest was created by Matthew Vance.
docker run -d \
--name=unbound \
-v unbound:/opt/unbound/etc/unbound/ \
-p 53:53/tcp \
-p 53:53/udp \
--restart=unless-stopped \
mvance/unbound:latest
Unbound Docker Variable Information is below
| Variable | Description |
--name=unbound | Names the container “unbound”. |
-v unbound:/opt/unbound/etc/unbound/ | Volume used to persist configuration data. |
-p 53:53/tcp | Exposes TCP Port 53 for DNS. |
-p 53:53/udp | Exposes UDP Port 53 for DNS. |
--restart=unless-stopped | Will ensure the container runs until it is manually stopped. |
mvance/unbound:latest | Docker image from the Docker Hub. |
Now, that you have your Unbound DNS container running, you can edit the configuration files located within the /opt/unbound/etc/unbound directory.
4. Configuring Your Devices to use Unbound
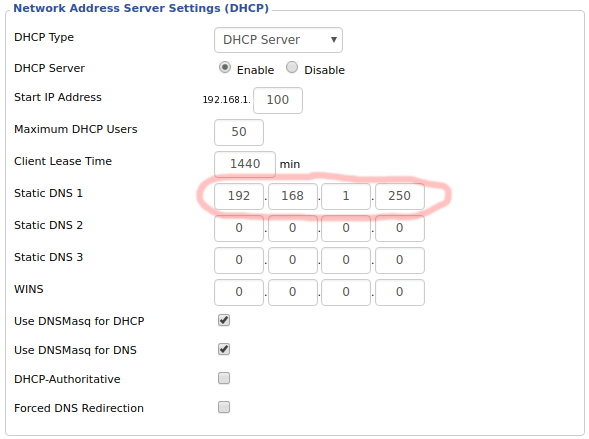
The final step in the process is to point your devices to utilize the Unbound DNS container. The easiest way to do that is by adjusting the DHCP settings within your router.
When you log in to your routers configuration page find the LAN (not WAN) DHCP/DNS settings section. Once you find it, you are going to want to set the DNS server to the IP address of your Unbound Docker container. This is also the same address you set in the SERVERIP variable in the Unbound Docker run command. Your Unbound docker container IP address should be the only DNS server in your router DHCP settings.

Once you save the settings in your router, restart your router. When it comes online, the routers DCHP server will assign the IP address to your Unbound DNS server to the devices on your network.
5. Testing
To test your Unbound Docker container, you can visit one of the devices on your network and visit any web page. If the page loads, then you are ready-to-go! If the webpage fails to load, you may have to perform some troubleshooting on your setup.
Success
Congratulations, your home network is now running independently from any third-party external DNS servers thanks to your self-hosted Unbound Docker container!
If you have any questions or comments, feel free to leave a comment below.
Thank you very much.