The mixed content error is an example of how making site-wide changes to your WordPress installation can complicate things, especially when your site has been up and running for a while. Making an adjustment as simple as installing an SSL certificate and changing the site settings to point to HTTPS instead of HTTP may not always work out as planned. It can also force web browsers to give your users a mixed content error.
The mixed content error that WordPress causes in Google Chrome will indicate to your users that they are visiting a website that is possibly not secure and encrypted. This can deter your users because they will feel like their data is at risk.
This is a quick tutorial on how to correct the mixed content error in WordPress so that your users will be able to access your website in a secure and encrypted way to protect their personal data.
What causes the Mixed Content Error?

Typically, when you install an SSL certificate on a WordPress server for the first time on a website that is already established, then some of the old images and content on older posts will not convert to the new link structure. Which means that the posts are still linking to images and other content with links that lead with HTTP rather than HTTPS. This leads to a Mixed Content Error in WordPress.
When you visit your website in Google Chrome, you will see “Not Secure” to the left of your website address in the address bar. The goal is for browsers to read your WordPress powered blog as “Secure” by changing all of the image URLs and other content URLs served in your older posts to HTTPS.
This doesn’t have to be a big project. I was able to accomplish it with one simple WordPress plugin that searched the database for my old URL and replaced it with the new one. The plugin was the Better Search Replace plugin.
Using the Better Search Replace Plugin
The Better Search Replace plugin does a fantastic job of searching your WordPress database tables for one phrase and replacing all instances of that phrase with another phrase across your entire website.
After you install the plugin, you can access it from the Tools menu within your WordPress admin dashboard.
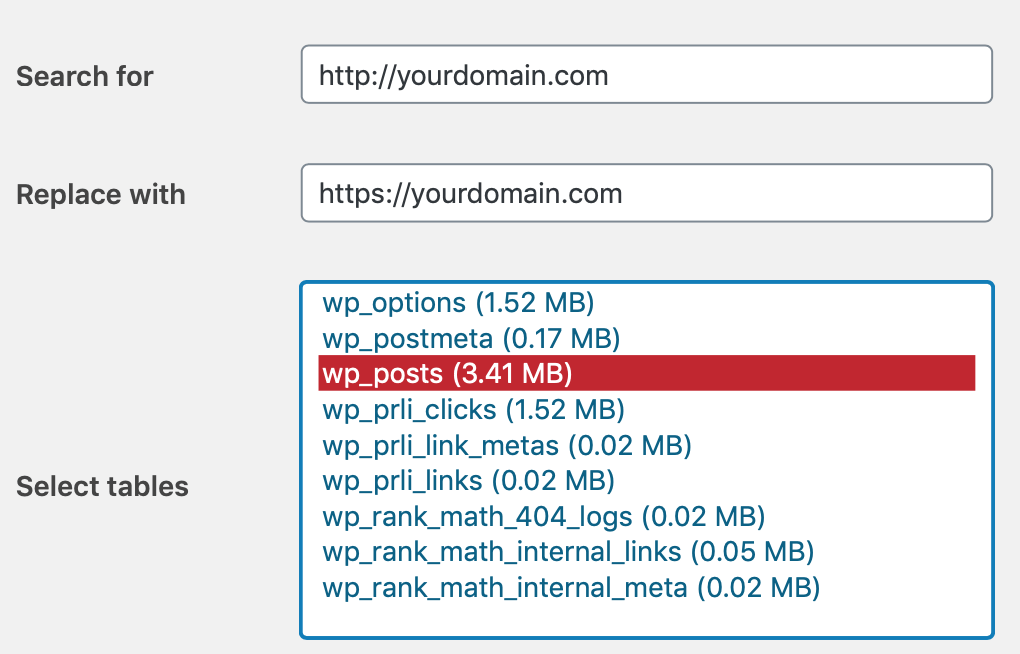
Once you open the plugin you will be prompted to enter your initial search phrase in the “Search for” field. In this field, type your website address without the “s” on the end of “http”. For example, http://yourdomain.com as seen below. Next, you’ll want to type out your website address with the “s” included on the end of “http” in the “Replace with” field. For example, https://yourdomain.com as seen below. Finally, you will want to select the wp_posts table in the “Select tables” box. The wp_posts table within your WordPress database contains the text and code for all of your blog posts.

That’s all you are required to configure on this form. Next, click the “Run Search/Replace” button and the plugin will begin to replace the insecure version (http) of your website address with the secure (https) version.
Testing Your Website

After you complete this process you should be able to visit your website in Google Chrome and get the “Secure” indicator to the left of your website address in the address bar. If you click it, you will see the following dialog box simlar to the one above.
Success!
If you are seeing the “Secure” indicator in Google Chrome, then you have successfully fixed your HTTPS mixed content error in WordPress.
If you have any questions then feel free to leave a comment below! If you would like to read more posts with WordPress tips and tricks, then you can visit the WordPress page here.
Excellent article! We will be linking to this particularly great content on our site. Keep up the great writing.
Very good write-up. I certainly love this site. Keep writing!